
1 Prerequisites
You should have read the User Guide.
Overbård development started on Jira 7.5.x, and is currently running with no problems on Jira 7.12.0. You must also have a Jira Software license which adds the Jira Agile functionality. If you don’t have a license, follow these steps.
Also, this guide assumes that you are familiar with, or able to look up in the Jira documentation, how to configure the underlying Jira concepts such as setting up projects, tweaking workflows and creating custom fields.
2 Installing Overbård
To install Overbård on your Jira instance you need to have the Jira administrator permission.
You can either build it yourself as mentioned in the Developer Guide. But it is easier
to download it from the Overbård Releases page. There is one download for Jira 7 and one for Jira 8. The versioning scheme is overbaard-jira-plugin-<tgt-jira-version>-<plugin-version>.jar so overbaard-jira-plugin-8-x.x.x.x.jar targets Jira 8.
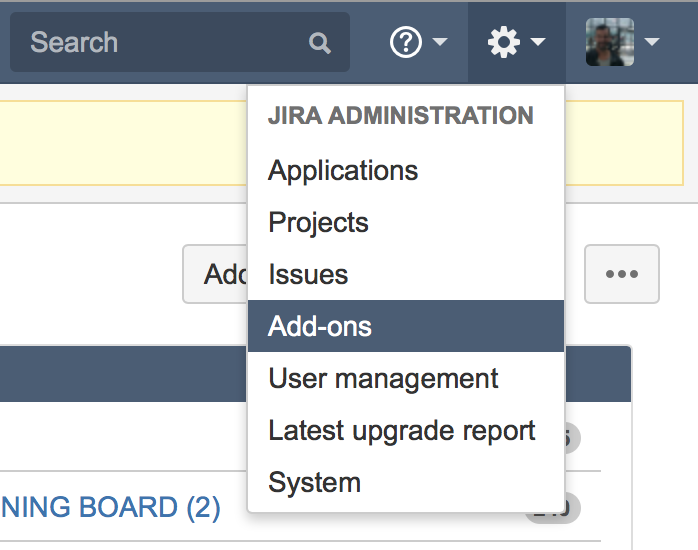
Once you have
it on your computer go to go to your Jira instance in the browser and select Add-Ons from the settings menu (the
cog in the top-right):
On the resulting page, click the Manage apps link and then the Upload app link on the next page (these will only
be visible if you actually are an Jira administrator). In the dialog to `Upload app’, select the saved jar.
In the future we might publish the plugin on the Atlassian Marketplace for easier installation.
3 Configuration page
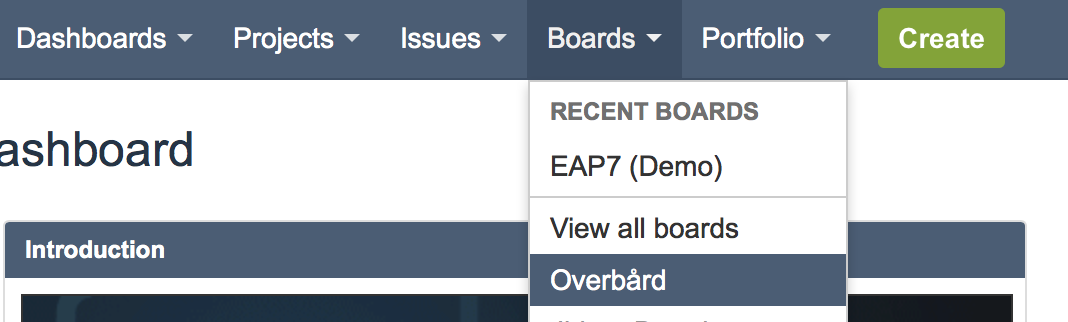
Go to your Jira instance, make sure you are logged in and click on the Overbård entry in the Boards menu.
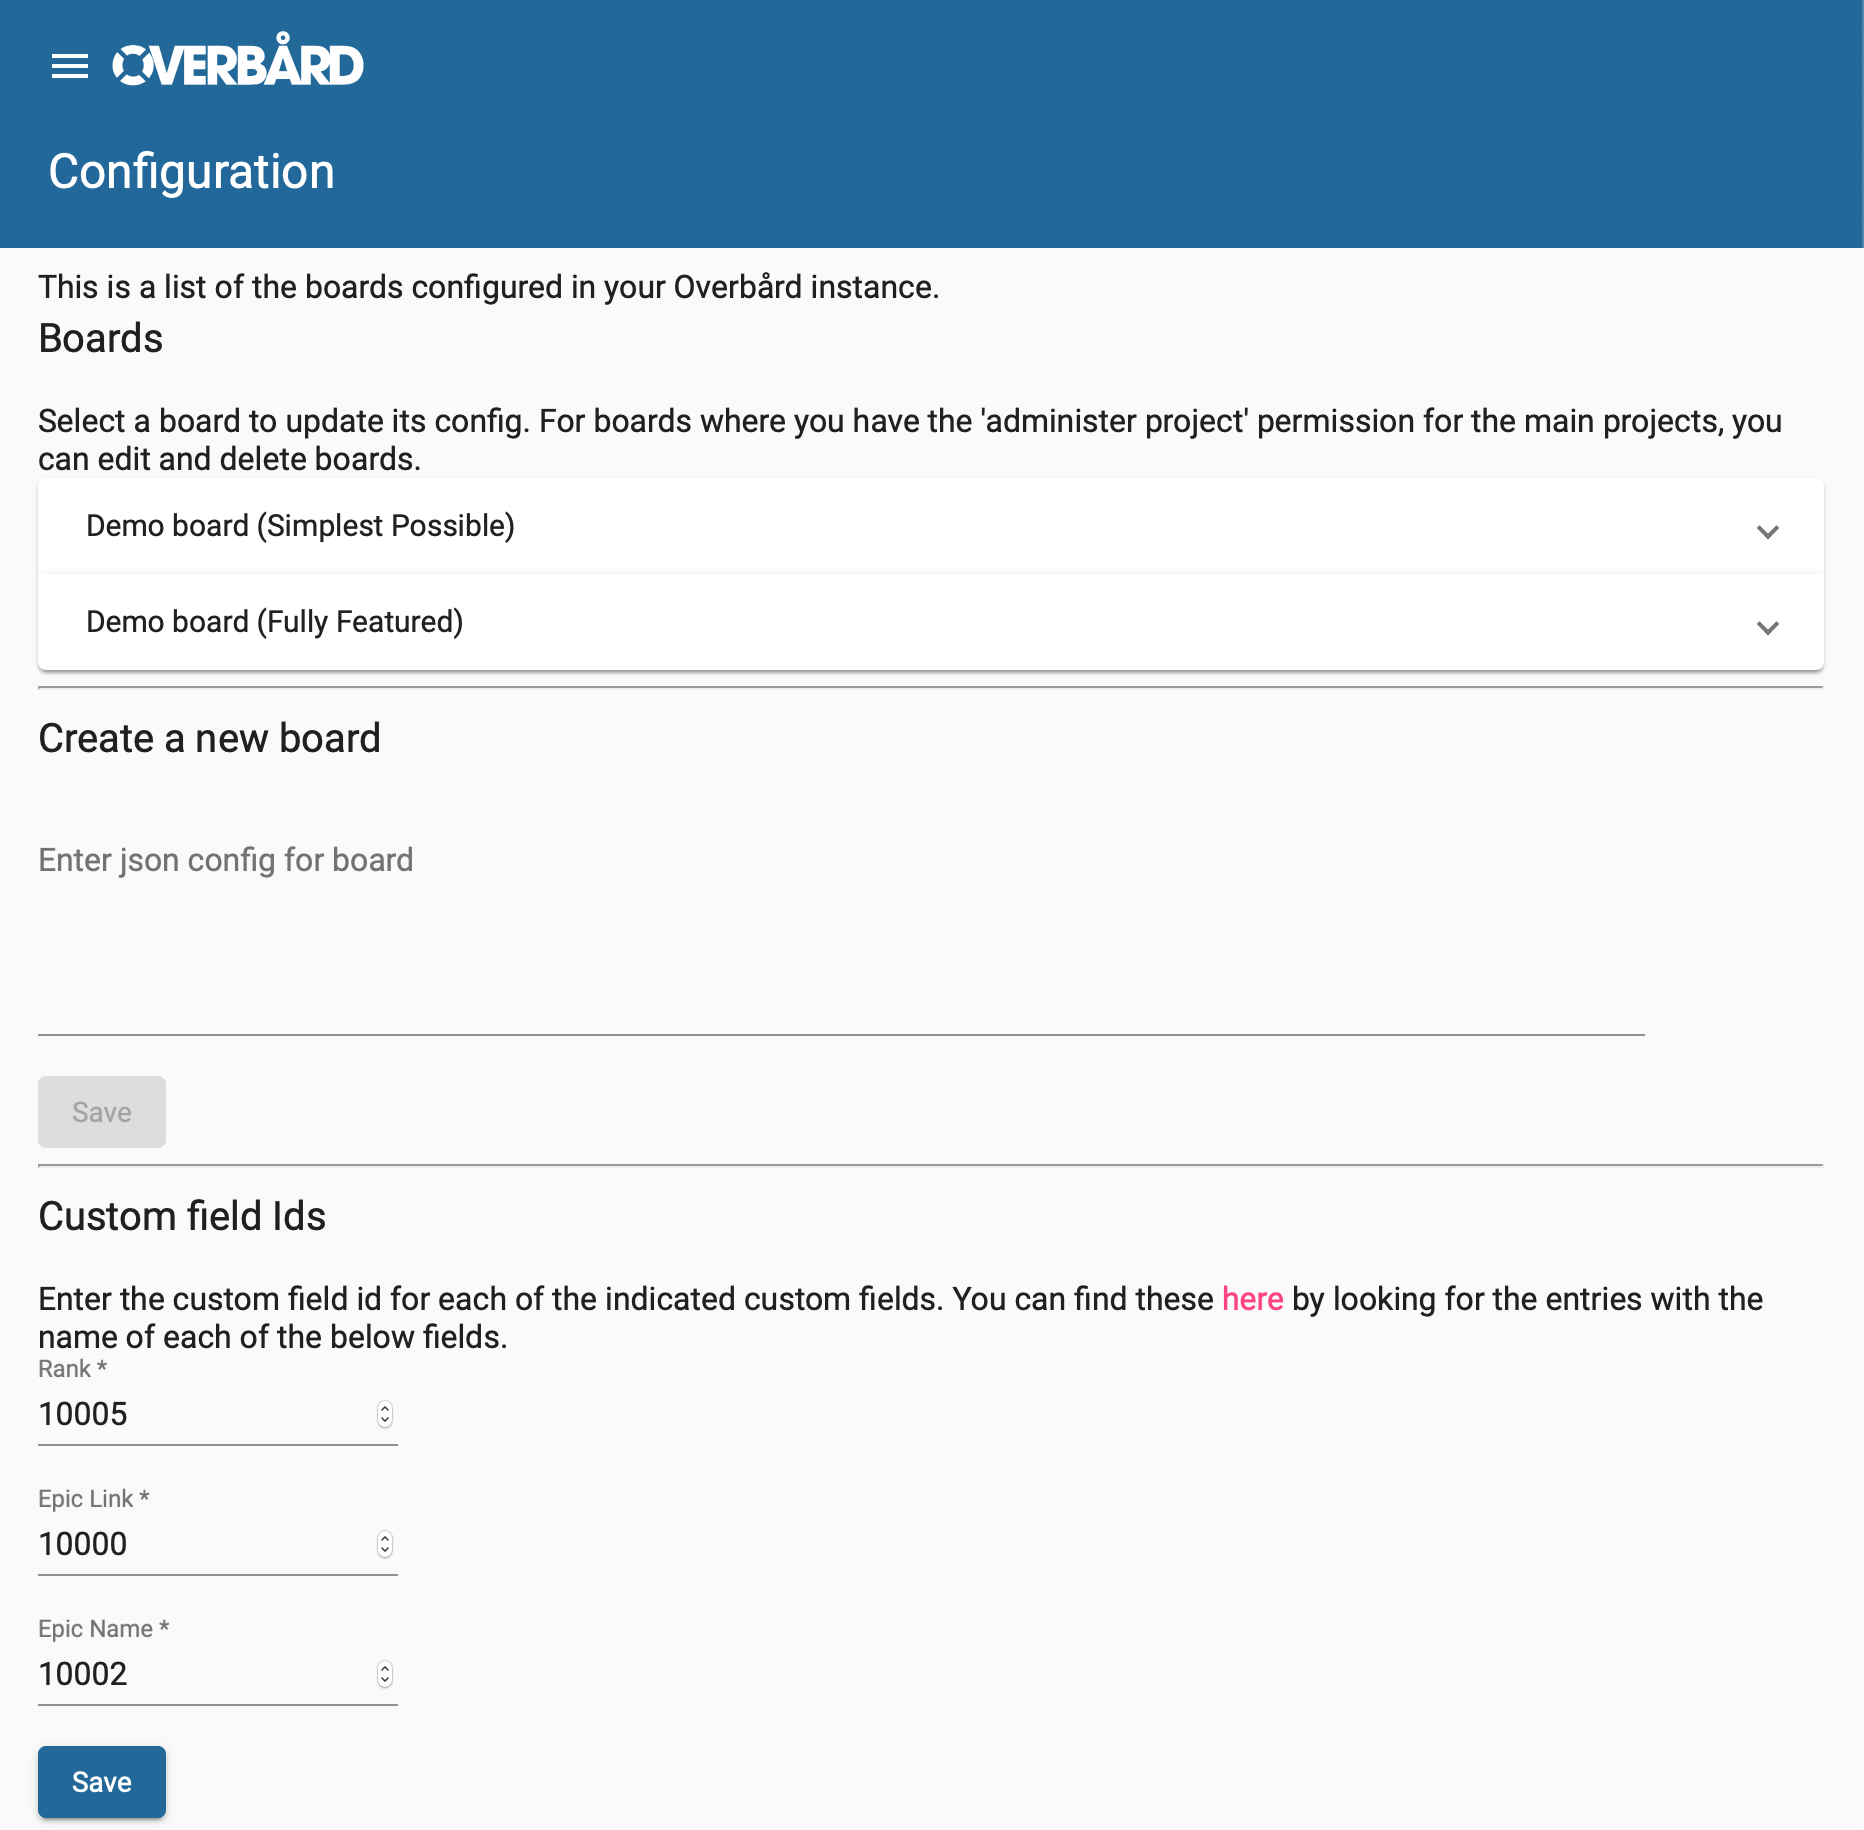
You will then be presented with a list of Overbård boards configured on your Jira instance:

Then click on the hamburger icon in the top left, and select Config from the left menu. You will now be presented
with the configuration page, where you can add new boards, and edit the configuration of existing ones. Boards are
configured using JSON, and the syntax will be explained in this guide.
3.1 Rank custom field id
An important step is to configure the rank custom field id. To do this, go to
http://my.jira.org/rest/api/2/field. Substitute
http://my.jira.org with the url of your Jira instance. If you are a developer
running Jira locally via the Atlassian SDK, this URL will by default be
http://localhost:2990/jira/rest/api/2/field. Search for Rank and get
the custom field id.
On my local instance this looks like:
{"id":"customfield_10005","name":"Rank","custom":true,
"orderable":true,"navigable":true,"searchable":true,
"clauseNames":["cf[10005]","Rank"],"schema":{"type":"any",
"custom":"com.pyxis.greenhopper.jira:gh-lexo-rank","customId":10005}}
so the id of the Rank custom field is 10005.
Enter the value you found into the Rank custom field id field on the bottom of the configuration page.
Then do the same looking for the Epic Link and Epic Name custom fields. These are important if you want to
enable epics. On my local instance the Epic Link id is 10000 and Epic Name is
10002.
4 Setting up a simple board
The following example discusses how to set up a very basic board, using a project with the standard states
when you create a project in Jira with the Kanban software development workflow. Don’t worry if you have an existing
project with different states, the concepts are the same.
The full JSON config can be found at simple.json. Let’s look at it in details, and describe the main sections.
Note that to set up (or edit) a board you need to either:
- Be a Jira Administrator
- Be a member of a group called ‘Overbaard Adminstrators’
- Be a project adminstrator for all projects contained in the board configuration
4.1 Global config
{
  "name": "Simple board",
  "code": "SIMPLE",
First we define the name of the board, which is what will appear in the list of boards. The code is used
in the URL used to link to the boards.
Next we define the states/columns for the board.
  "states": [
    {
      "name": "My Backlog",
      "backlog": true
    },
    {
      "name": "My Selected for Development"
    },
    {
      "name": "My In Progress"
    },
    {
      "name": "My Done"
    }
  ],
We can call the columns what we like, we will map them later to project states when we choose the projects to include
in the board. Note that the "backlog": true setting for the My backlog state column means that the column will
be considered the backlog. When loading a board, the backlog column is displayed in a different colour, and is
collapsed by default.
Finally, for this simple example we define the issue priorities and issue types. For most other fields, Overbård will use the data from the issues to determine the values available for filters and swimlanes. However, for the priorities and issue types we give them a name and a colour. The name must match the name that shows up in Jira when selecting either and the colour will appear in the issue card headers. The colour must be something that would be valid in standard html. Finally, as the priorities and issue types are both arrays, this determines the order that these entries will show up in the board control panel.
  "priorities": [
    {
      "name": "Highest",
      "colour": "red"
    },
    {
      "name": "High",
      "colour": "darkred"
    },
    {
      "name": "Medium",
      "colour": "orange"
    },
    {
      "name": "Low",
      "colour": "greenyellow"
    },
    {
      "name": "Lowest",
      "colour": "green"
    }
  ],
  "issue-types": [
    {
      "name": "Task",
      "colour": "blue"
    },
    {
      "name": "Story",
      "colour": "green"
    },
    {
      "name": "Bug",
      "colour": "red"
    },
    {
      "name": "Epic",
      "colour": "purple"
    }
  ],
4.2 Projects config
Next we have the configuration of the projects to display on the board. For this simple example we only display one.
  "projects": [
    {
      "code": "PROJ",
code is the key of the project in Jira that we want to show on the board.
"query-filter": null,
query-filter is optional, and is not set in this example. Behind the scenes, Overbård will execute a JQL query along the
lines of project=PROJ [query-filter] ORDER BY Rank so the query-filter is a great way to narrow down the issues
loaded for the board.
"colour": "#4667CA",
colour specifies the html colour code to use for issues from the specified project.
      "state-links": {
        "Backlog" : "My Backlog",
        "Selected for Development" : "My Selected for Development",
        "In Progress" : "My In Progress",
        "Done" : "My Done"
      }
Finally we have a state-links map which maps the states from the project’s workflow to the state column names
we created earlier.
    }
  ],
  "linked-projects" : {}
The linked-projects are not needed, but are left here empty. They will be discussed later.
}
4.2.1 Enabling Epics
By default we don’t enable tracking of issues via epics. To turn this on for a project, add
"enable-epics":true to the projects you want to enable epics for.
epics.json
is a copy of simple.json that we have been using so far, and does this for the PROJ project (apart from that the
contents of the two files are the same):
  "projects": [
    {
      "code": "PROJ",
      "query-filter": null,
      "colour": "#4667CA",
      "enable-epics": true,
Epics will now be turned on for the project. When epics are turned on you are able to select Epics as one of the
swimlane choices.
      "state-links": {
        "Backlog" : "My Backlog",
        "Selected for Development" : "My Selected for Development",
        "In Progress" : "My In Progress",
        "Done" : "My Done"
      }
5 Board with several projects
The previous section shows a simple board with just one project. We can also add several projects to our board.
The full JSON config can be found at
several-projects.json. Most of
the JSON is the same as in the previous example; the difference is in the projects section:
  "projects": [
    {
      "code": "PROJ",
      "query-filter": null,
      "colour": "#4667CA",
      "state-links": {
        "Backlog" : "My Backlog",
        "Selected for Development" : "My Selected for Development",
        "In Progress" : "My In Progress",
        "Done" : "My Done"
      }
    },
    {
      "code": "ANOTHER",
      "query-filter": null,
      "colour": "blue",
      "state-links": {
        "TODO": "My Backlog",
        "In Progress": "My In Progress",
        "Complete": "My Done"
      }
    }

  ],
As you can see we have added another project called ANOTHER to the array of projects to be shown on the board. It has
a different colour so we can easily see which issue cards belong to which project on the board. The configuration for
PROJ is the same as in the previous example.
It is worth noting that the ANOTHER project uses a different workflow from PROJ. It has less states, and the states
have different names from the states used in the PROJ project.
One thing to note is that there is no overall ranking across projects. Rather issues are presented in rank order for
each project separately. The order of the display of issues by project is the same as their order in the projects
array. In other words, for this example, that means that in each column on the board, issues from
PROJ will be displayed in rank order, and then the issues from ANOTHER will be displayed in rank order.
6 Board with advanced headers
We will now have a look at some of the more advanced configuration options to set up the headers. The full JSON config can be found at headers.json. Again we will focus on the differences from the previous examples:
  "states": [
    {
      "name": "Backlog",
      "backlog": true
    },
    {
      "name": "High Priority Backlog",
      "backlog": true,
      "help": "This is the high priority backlog!\n\nSomeone important has decided these are the top priority"
    },
Note that there are two "backlog": true states in our list of states. These two states will be grouped under a header,
which will be collapsed by default when the board is first loaded. Both states will have the alternative colour used
for the backlog in Overbård.
You can use "backlog": true on as many states as you like, but they must all be at the start of the array of states.
The text specified by help gives a tooltip that shows up when you hover over the state column header when looking at
the board. The text in help can contain newlines, as shown above.
    {
      "name": "In Progress",
      "wip": 10,
      "header": "Development"
    },
    {
      "name": "Pull Request Sent",
      "header": "Development",
      "help": "A pull request has been sent"
    },
The above two states are grouped using the header field. They will still both show up as individual columns,
but will be grouped under a header. The header can be used to collapse/expand all the contained states at the same time.
Note that when using header the states must be contiguous, no gaps are allowed.
The In Progress state has a wip limit of 10. If the state has more issue than that the column counts in the
header will become red.
    {
      "name": "QA TODO",
      "header": "QA"
    },
    {
      "name": "QA In Progress",
      "header": "QA",
      "help": "QA is trying to break the feature"
    },
Above we have two states under the QA header.
    {
      "name": "Verified"
    },
Although we have been using headers for our states so far, we don’t have to do that for all states. The Verified
state shown above does not use headers.
    {
      "name": "Closed",
      "done": true
    }
The "done": true state is a special case. It will not be shown on the board! Rather it is a signal for when
we do the project state-links for which issues to ignore
  ],
  ...
  "projects": [
    {
      "code": "PROJ",
      "query-filter": null,
      "colour": "#4667CA",
      "state-links": {
        "Backlog": "Backlog",
        "High Priority Backlog": "High Priority Backlog",
        "In Progress": "In Progress",
        "Pull Request Sent": "Pull Request Sent",
        "QA TODO": "QA TODO",
        "QA In Progress": "QA In Progress",
        "Verified": "Verified",
        "Closed": "Closed",
        "Shipped": "Closed"
      }
    }
  ],
In our PROJ project, we map issues in the Closed and Shipped states from PROJ’s workflow to the Closed column
on the board. Remember that the Closed column is not actually shown since it is marked with "done": true. Rather
what happens, is that when executing the JQL to load the board into the Overbård server-side cache, issues from
these states are omitted. It is a mechanism to not load now irrelevant issues into Overbård.
7 Board with custom fields
By default Overbård will automatically populate swimlanes and options for filtering from the issue data for:
- Assignee
- Component
- Label
- Fix Version
In addition it presents the options to use swimlanes and options for filtering issues for (we have seen in the previous sections that some minimum configuration is needed to set these up):
- Project
- Issue Type
- Priority
However, we can further extend the functionality of Overbård to do this for custom fields. So far (because they were needed for managing the JBoss EAP project at Red Hat) it supports two types:
version- For my project we have a custom field calledTarget Release. It is a custom field which allows selection of one release. Theversioncustom field type is suitable for such a custom field.user- For my project we have a custom fields calledTesterandDocumenter. In Jira these areUser Picker (single user)custom fields. Theusercustom field type is suitable for such a custom field.single-select- For my project we have a custom field calledTested Bywhich has some pre-defined entries for the various options. In Jira these areSelect List (single choice)custom fields. Thesingle-selectcustom field type is suitable for such a custom field.
If you want support for other types of custom fields, open an issue and we can discuss the viability.
Let’s take a look at how to configure a Tester custom field (of type user) for a board. The full JSON config
can be found at
custom-field.json. The important parts are discussed below.
In the global part of the configuration we declare the custom fields we are interested in.
  "custom": [
    {
      "name": "Tester",
name is the name that will be used for the field when presented in the list of swimlanes options and in its
corresponding filter header.
"type": "user",
We specify that it is of type user as discussed above.
"field-id": 121212121212
This is the Jira id of the field we are interested in. You can find this by going to
http://my.jira.org/rest/api/2/field (adjusting the URL as mentioned earlier),
or by going to the Issue Types screen in the Jira Administration section of your Jira instance.
    }
  ],
Next we configure the custom field for use with projects it should be used for. This is because a board can have more than one project and custom fields might not be relevant to all of them.
  "projects": [
    {
      "code": "PROJ",
      "query-filter": null,
      "colour": "#4667CA",
      "state-links": {
        ...
      },
      "custom": [
        "Tester"
      ]
Here we have listed the custom fields that we should use for the PROJ project. It is a list of the name fields
of the custom fields we want to use for the project. Now when loading the board, Overbård will inspect all issues
in the PROJ project and also look for the values of this field, which will be available in the Tester filter and
swimlanes!
}
8 Linked projects/issues
As discussed in the User Guide we can configure a board’s issue cards to show links to linked issues from other projects. This section describes how to do this. The full JSON config can be found at linked-issues.json, and the important parts are discussed below.
First we need to populate the linked-issues section that we have touched upon before:
  "linked-projects": {
    "FIRST": {
      "states": [
        "TODO",
        "In Progress",
        "Done"
      ]
    },
    "SECOND": {
      "states": [
        "Backlog",
        "In Progress",
        "QA",
        "Verified"
      ]
    }
  }
We have declared two projects that we are interested in: FIRST and SECOND. For each project, we list the
states from their individual workflows. These are listed in order, and are used as a lookup to determine a colour
for the linked issue in board issue it is linked to from. For example a SECOND issue in the Backlog state will appear
as red, and a SECOND issue in Verified will appear as green.
Next we need to reference these linked projects from our main projects. Again we might have more than one project
configured for the board, and they might have different interests in which issues from the linked projects they should
display. In the following example the PROJ project is set up to reference both linked projects, via the linked-issues
field. The linked-issues field has a filter attribute that can be used to narrow down which issues are selected.
  "projects": [
    {
      "code": "PROJ",
      "query-filter": null,
      "colour": "#4667CA",
      "state-links": {
        ...
      },
      "linked-issues": [
        {
          "projects": [
            "FIRST"
We are interested in issues from the FIRST linked project. Although this list just contains one entry, we could have
added more.
          ],
          "filter": {}
The filter is empty so any issue from FIRST linked to by PROJ issues will be shown on the board.
        },
        {
          "projects": [
            "SECOND"
Here we are interested in issues from the SECOND project.
          ],
          "filter": {
            "issue-types": [
              "Bug",
              "Task"
            ],
            "priorities": [
              "Highest"
            ],
            "labels": [
              "Upstream_feature"
            ],
            "link-names": [
              "cloned to",
              "cloned from"
            ]
          }
This filter specifies that the PROJ issue cards should include linked issues from the SECOND project but only if the
linked SECOND issue:
- has a type of
BugorTask, and - has a priority of
Highest, and - is labelled with the
Upstream_featurelabel, and - the link type is either
cloned toorcloned from
You can use as few or as many of these fields as you like to narrow down exactly which linked issues you are interested in.
        }
      ]
    }
9 Manual swimlanes
The User Guide talks about the various swimlanes that get enabled automatically when setting up an
Overbård board. However, you can also set up additional swimlanes manually for more targetted views for your users.
To do this you add the manual-swimlanes section to your board config and add entries to it.
  "manual-swimlanes": [
    {
      "name": "Manual Swimlane",
      "entries" : [
        {
          "name": "High priority bugs",
          "issue-ql": "priority IN ('Highest', 'High') AND type = 'Bug'"
        },
        {
          "name": "High priority tasks",
          "issue-ql": "priority IN ('Highest', 'High') AND type = 'Task' s"
        }
      ]
    }
  ]
In the Swimlane drop-down list in the control panel, the user will now see an additonal entry called Manual Swimlanes
(after Search, Project, Issue Type etc.), and when selecting that swimlane view they will have two lanes, the first
called High priority bugs and the second called High priority tasks (at the end there will be also be a
None swimlane for all issues which are not part of either of the two manually configured swimlanes).
Each swimlane entry contains an issue-ql entry. This is an ‘Issue QL’ string used to pick out issues we want
to be displayed in each swimlane. For more information about Issue QL, see the Issue QL Guide.
10 Parallel tasks
As mentioned in the User Guide Overbård has a feature called Parallel Tasks. The way we use them on the EAP project is that there are a set of requirements worked on by different teams that should be satisfied by the time we merge a feature. Some of these are:
- Analysis Document - it needs to be written and agreed upon by the different stakeholders
- Documentation - it needs to be written, and reviewed by the various teams
- Test Development - Done by the QE team along with the development of the feature
- Pre-Check - Once the feature is complete, QE checks that the new tests work and that no regressions are introduced.
These are things which:
- need to be done for all new features
- often involve cross-team collaboration
- each have more than one state (so a simple checkbox won’t do). E.g. the Analysis Document Parallel Task has the states
TODO,In Progress,Review,Approved - if split up into Jira sub-tasks would seriously clutter up the board, with no immediate view of how each issue’s tasks are progressing.
To set up Parallel Tasks in Overbård, you first need to configure a custom field for each Parallel Task in Jira. The
custom fields must be of the type Select List (single choice). For each field give them the values you want (in the
Analysis Document example mentioned, you would specify TODO, In Progress, Review and Approved ), and set the
first one as the default value. The order of the values is important and should be from start to finish, as the colour
shown for each parallel task on the issue cards gives an indication of how far the task has progressed, with red being
not started (i.e. the first ) value and green being the finished (i.e. the last) value.
Then associate these custom fields with the screens for your project.
Then in Overbård we configure the Parallel Tasks as shown in parallel-tasks.json. The notable parts follow:
  "parallel-tasks": {
    "fields": [
      {
        "name": "Analysis Document",
        "type": "parallel-task-progress",
        "field-id": 121212121212,
        "display": "AD"
      },
      {
        "name": "Documentation",
        "type": "parallel-task-progress",
        "field-id": 121212121213,
        "display": "DC"
      },
      {
        "name": "Test Development",
        "type": "parallel-task-progress",
        "field-id": 121212121214,
        "display": "TD"
      },
      {
        "name": "Pre-Checked",
        "type": "parallel-task-progress",
        "field-id": 121212121215,
        "display": "PC"
      }
    ]
  },
Similar to custom fields, we define all the parallel tasks in the parallel-tasks section in the global
part of the configuration. Each parallel task has:
- a
name, which is displayed in the board filters in the control panel - a
typewhich is alwaysparallel-task-progress - a
field-idwhich is the id of the custom field, which you can find by going to http://my.jira.org/rest/api/2/field (adjusting the URL as mentioned earlier). - a
displayvalue. This is a two letter code which appears for each parallel task in the parallel task section in the issue cards. Note that we are not configuring any values for the parallel tasks here, those are loaded from each of the custom field configuration that we set up earlier in this section.
Next, we need to associate the parallel tasks for the project (on a board where we have more than one project, each project might have different or intersecting parallel task requirements):
  "projects": [
    {
      "code": "PROJ",
      "query-filter": null,
      "colour": "#4667CA",
      "state-links": {
        ...
      },
      "parallel-tasks": [
        [
          "Analysis Document",
          "Documentation"
        ],
        [
          "Test Development",
          "Pre-Checked"
        ]
      ]
    }
Note that the parallel tasks are grouped, so that AD (Analysis Document) and DC (Documentation) will appear in
one group and TD (Test Development) and PC (Pre-Checked) will appear in another.
11 Issue type overrides
This a slightly more advanced topic, which builds on what we have learnt so far. We have seen how to map project states to the Overbård columns, and how to configure parallel tasks and linked issues on a per project basis. However, for the state mappings, different issue types can have different workflows which in turn means a set of different states. Similarly, parallel tasks and linked issues may be relevant to one issue type but not the others, or different issue types might have different parallel task and linked issue needs.
11.1 State mapping overrides
state-mapping-overrides.json shows a sample config for configuring different state mappings for different issue types.
In short what the below snippet does is define different state mappings for issues which have the type
Task or Bug. Issues which do not have these issue type have the standard state mappings.
  "projects": [
    {
      "code": "PROJ",
      "query-filter": null,
      "colour": "#4667CA",
      "state-links": {
        "Backlog": "Backlog",
        "Selected for Development": "Selected for Development",
        "In Progress": "In Progress",
        "Done": "Done"
      },
      "overrides": {
        "state-links": [
          {
            "issue-types": ["Task", "Bug"],
            "override": {
              "TODO" : "Backlog",
              "In Progress" : "In Progress",
              "Verified": "Done"
            }
          }
        ]
      }
    }
  ],
11.2 Parallel task overrides
parallel-task-overrides.json shows a JSON config for setting up different parallel tasks for different issue types.
The set up of the parallel tasks in the global section of the configuration is the same as we have seen before. The example uses a board with two projects to be able to show all permutations in one example.
  "projects": [
    {
      "code": "PROJ",
      "query-filter": null,
      "colour": "#4667CA",
      "state-links": {
        ...
      },
      "parallel-tasks": [
        [
          "Analysis Document",
          "Documentation"
        ],
        [
          "Test Development",
          "Pre-Checked"
        ]
      ],
The above are the parallel tasks for issues in the PROJ project. These will be used for issue types
that there are no overrides for. (As we have overrides for Task, Story and Bug, in effect this means that only
issues that have the type Epic will use these default parallel tasks).
      "overrides": {
        "parallel-tasks": [
          {
            "issue-types": ["Task", "Story"],
            "override": [
              [
                "Analysis Document",
                "Documentation"
              ]
            ]
          },
Issues in project PROJ that have an issue type of Task or Story only use the Analysis Document and
Documentation parallel tasks.
          {
            "issue-types": ["Bug"],
            "override": null
          }
Issues in project PROJ that have an issue type of Bug have parallel tasks disabled.
        ]
      }
    },
    {
      "code": "ANOTHER",
      "query-filter": null,
      "colour": "blue",
      "state-links": {
        ...
      },
In the ANOTHER project, there are no project wide parallel tasks configured. There is an override for the
issue type Task, so that issues of that type will have the parallel tasks shown below. Issues of any other type
will not have parallel tasks.
      "overrides": {
        "parallel-tasks": [
          {
            "issue-types": ["Task"],
            "override": [
              [
                "Analysis Document",
                "Documentation"
              ],
              [
                "Test Development",
                "Pre-Checked"
              ]
            ]
          }
        ]
      }
    }
  ],
11.3 Linked issue overrides
linked-issue-overrides.json
shows a JSON config for setting up
different parallel tasks for different issue types. As before let’s look at the linked-projects section first. It
looks a lot like it did before but SECOND has a new type-states map. This is needed if the SECOND project
has different workflows for different issue types. As mentioned the earlier the state of the linked issue is used to
calculate a colour for the linked issue (with red denoting the first state, and green the last state). If the linked
issue from the SECOND project has the type Task or Bug the relevant set of states will be used to calculate the
colour. For all other issue types, the list of states in the states field will be used.
  "linked-projects": {
    "FIRST": {
      "states": [
        "TODO",
        "In Progress",
        "Done"
      ]
    },
    "SECOND": {
      "states": [
        "Backlog",
        "In Progress",
        "QA",
        "Verified"
      ],
      "type-states": {
        "Task": ["TODO", "In Progress", "Done"],
        "Bug": ["TODO", "Doing", "Done"]
      }
    }
  }
The above is an extra dimension to overrides for linked issues. The next part is similar to what we already saw for parallel task and state mapping overrides:
  "projects": [
    {
      "code": "PROJ",
      "query-filter": null,
      "colour": "#4667CA",
      "state-links": {
        "Backlog": "Backlog",
        "Selected for Development": "Selected for Development",
        "In Progress": "In Progress",
        "Done": "Done"
      },
      "linked-issues": [
        {
          "projects": [
            "FIRST"
          ],
          "filter": {
            "priorities": ["High"]
          }
        }
      ],
      "overrides": {
        "linked-issues": [
          {
            "issue-types": ["Story"],
            "override": [
              {
                "projects": ["FIRST"],
                "filter": null
              },
              {
                "projects": ["SECOND"],
                "filter": {
                  "priorities": ["High"]
                }
              }
            ]
          }
        ]
      }
Here we have an override for when the PROJ issue is of type Story, and a linked-issues setting for the project.
If the issue type is not Story we will display all linked issues from the FIRST linked project where the priority
is High. If the issue type is Story, we do not display linked issues from the FIRST project, and display all
linked issues from the SECOND project where the priority is High.
    },
    {
      "code": "ANOTHER",
      "query-filter": null,
      "colour": "blue",
      "state-links": {
        "Backlog": "Backlog",
        "Selected for Development": "Selected for Development",
        "In Progress": "In Progress",
        "Done": "Done"
      },
      "overrides": {
        "linked-issues": [
          {
            "issue-types": ["Story"],
            "override": [
              {
                "projects": ["FIRST"],
                "filter": {
                  "priorities": ["Highest"]
                }
              }
            ]
          }
        ]
      }
For the ANOTHER project there is no linked-issues setting for the project, but there is an override for when the
issue type is Story. So, if the ANOTHER issue type is Story we link to issues from the FIRST project that have
the Highest priority. Issues with other issue types in the ANOTHER project do not get linked issues displayed on
the board.
    }
  ],
12 Diagnosing problems
When entering the board configuration, if you have got something wrong the server will validate the JSON to see if it is valid configuration. It will also (at least in most cases!) display an error message to help you pinpoint what went wrong.
12.1 Health Panel
Once you have successfully saved the board config, if you go and view the board, you might get a message about an error having happened loading the board, and be asked to view the health panel. The health panel is accessed by clicking the alarm clock icon in the bottom right. This icon will only be shown if there actually is a problem.
The health panel will list issues that there is a problem with, and it will be due to either:
- an issue loaded which has a type not configured in the
issue-typessection in the global configuration - an issue loaded which has a priority not configured in the
prioritiessection in the global configuration - an issue loaded which has a state not configured in the project or the relevant overrides
state-linksmap.
To get rid of the health panel warning, go in and add the issue type, priority or the missing state.
13 Configuration History
Generally the configuration validation will pick up on bad configurations before it is stored to the database. However, accidents can still happen. You might change your configuration into something not working, or you might end up accidentally deleting it. To help deal with these situations, you can access the configuration history. It is not currently exposed in the UI, but you can view the REST URLs in the browser (just make sure you are logged into Jira), as this is hopefully not something you will need to use very often!
The entry point URL is http://my.jira.org/rest/overbaard/1.0/board-config-history (In the below examples http://my.jira.org/ is
http://localhost:2990/jira as I have taken them from running the SDK locally).
When I go to that URL I get something like:
{
    "next" : "http://localhost:2990/jira/rest/overbaard/1.0/board-config-history?from=16",
    "entries" : [
        {
            "id" : 20,
            "code" : "TSTx",
            "board_id" : 4,
            "changed_by" : "admin",
            "change_type" : "Updated",
            "time" : "2019-04-18T15:56+0100",
            "url" : "http://localhost:2990/jira/rest/overbaard/1.0/board-config-history/20"
        },
        {
            "id" : 19,
            "code" : "Tmp",
            "board_id" : 28,
            "changed_by" : "admin",
            "change_type" : "Deleted",
            "time" : "2019-04-18T15:45+0100",
            "url" : "http://localhost:2990/jira/rest/overbaard/1.0/board-config-history/19"
        },
        {
            "id" : 17,
            "code" : "Tmp",
            "board_id" : 28,
            "changed_by" : "admin",
            "change_type" : "Created",
            "time" : "2019-04-18T15:36+0100",
            "url" : "http://localhost:2990/jira/rest/overbaard/1.0/board-config-history/17"
        }
        ...
You can also specify the board id in the board_id query parameter, i.e.
http://localhost:2990/jira/rest/overbaard/1.0/board-config-history?board_id=4 narrows down the results to each one
{
    "next" : "http://localhost:2990/jira/rest/overbaard/1.0/board-config-history?from=8&board_id=4",
    "entries" : [
        {
            "id" : 20,
            "code" : "TSTx",
            "board_id" : 4,
            "changed_by" : "admin",
            "change_type" : "Updated",
            "time" : "2019-04-18T15:56+0100",
            "url" : "http://localhost:2990/jira/rest/overbaard/1.0/board-config-history/20"
        },
        {
            "id" : 15,
            "code" : "TST",
            "board_id" : 4,
            "changed_by" : "admin",
            "change_type" : "Updated",
            "time" : "2019-04-17T22:13+0100",
            "url" : "http://localhost:2990/jira/rest/overbaard/1.0/board-config-history/15"
        },
        ...
We use the board_id rather than its code for this, as when you update a board you can change its code, while the
board_id is its primary key in the backing database. The number of results are limited (currently hardcoded to 50),
with basic paging via the url in the next field.
For each history entry we have the following fields:
id- the primary key of the history entrycode- the current code of the boardboard_id- the primary key of the board itselfchanged_by- the Jira key of the user who made the changechange_type-Created,UpdatedorDeletedtime- The date and time the board config was changedurl- a url to get more detail about the change. We will look more at this in the next sub-section
13.1 Config history detail
Going into http://localhost:2990/jira/rest/overbaard/1.0/board-config-history/20 you will be presented with something
like:
{
    "id" : 20,
    "name" : "Test board",
    "code" : "TSTx",
    "owner" : "admin",
    "board_id" : 4,
    "changed_by" : "admin",
    "change_type" : "Updated",
    "time" : "2019-04-18T15:56+0100",
    "config" : {
        "name" : "Test board",
        "code" : "TSTx",
        "states" : [
            {
All the fields here have the same meaning as described above. We have some additional fields which have the following meanings:
name- the name of the boardowner- the ‘owner’ of the board (really the last person to update the config)config- a copy of the configuration entered in the board configuration page. When thechange_typeis eitherCreatedorUpdated, it contains the config that was saved. When thechange_typeisDeleted, this field contains the configuration as it was before the entry was deleted.